Service Portal is a powerful framework for building self-service websites and custom web app UIs. Using a hierarchy of table driven components, Service Portal simplifies the process and reduces the code required to build a web interface.
With Service Portal, you can deliver your apps to employees through a modern, easy to use portal they can access from any device, any time.
To create a service portal, navigate to Service Portal => portals => New button, the following form will be displayed,

Enter Title , URL suffix (used to run the service portal in the browser) as shown in above form.
To run this portal,write URL suffix at the end of the current instance URL as below,

Page
Pages control where and how you store portal content.
To create page navigate to Service Portal => Pages and click on New Button to create a page. The following form will be displayed ,

Enter the title ,Id for the page and save the changes.
After creating this page,At the bottom click on “Open in Designer” link, to create the content on the page,as below,

The following “Page Designer” will be displayed on the browser ,

From the Widgets tab at the left , from layouts ,
First we need to add a container and then divide that container using a required grid to divide the space in the container.
In the below snapshot we have added the container and [6 6] grid and we have added widgets calculator and clock as a content ,

You can add this page to portal by following way,
Open your service portal and select Homepage as the page name that we want to add.

Now go to the portal by entering the URL suffix (snowtraining) at the end of the current instance URL in the browser,you will get the page that we have added as below,

Menus
To create Menu,navigate to Service Portal => Menus and click on New button to create the Menu as below,

How this Menu should appear on the page we can select in widget,
For example , below,Training Menu should appear as Header Menu on a page so select “Header Menu” as Widget as below,

Save above Menu. Add Menu Item by clicking “New” button from “Menu Item” section at the bottom as below,

Create Menu item as shown in below screenshot,

As shown in above screenshot, Enter Type of Menu,Catalog item and Page for that menu
Type : Catalog Item
Page : this decides where to display catalog item, “sc_cat_item” is used to display catalog item.
You can add these above Menu to the service portal by selecting the Menu as below,

Service Portal Configuration
Branding Editor :
Used to customize the portal’s title,logo and theme colors.
Navigate to Service Portal => Service Portal Configurator as below,

The following configuration page will be displayed in the browser,
Click on Branding Editor,to customize portal’s title,logo and theme colors.
The following page will be displayed,


Simple List example :
Create a page to display a list of incidents and problems using Simple List widget.
 ’
’
Click on Open in Designer to design a page,

Drag and drop 2 containers and divide them using grid as below,

Drag and Drop a Simple List widget into Container 1 as follows,

Click on pencil to edit the list,following window will be displayed,


Configure 2nd simple list for Problem table as below,


We can link this page to Menu.
Create one menu and link the above page(tr_incident) to it as follows,


Save the above Menu and go to the portal,you can see the Menu named as Ticket that we have just created as follows,

Click on that Ticket Menu,the list of incident and problem will be displayed as follows,

If you click on any incident ,the following page will be displayed in which we can only write the issues.,because on the page we have set Link Type as Ticket.,

Click on any Problem,

The form will be displayed as follows because on page we have set Link Type as Form.

Add Search on Homepage :
We can use existing instances on a page.
For example , Use “Search” from the below Service Portal to our Service Portal ,

For that ,open Service Portal and check which instance is used for displaying “Search” on Homepage in this service portal,

Open a Record of Homepage to know the instance as follows,

The following Page will be displayed and you can see the “Homepage Search” instance is used to display the Search on HomePage.

Now,Open our homepage in design mode and add one container at the top and drag and drop “HomePage Search”in that container as below,


Navigate to our portal by entering our developer instance URL with suffix snowtraining ,the “Search” will be displayed as follows,

Design Page without Designer:
You can design a page directly on the page without using Designer.
For that ,open a page ,at the bottom there is a list of containers. Create a new container by clicking on New button,


At the bottom, Click on Column 1 of newly created container as below,

At the bottom click on New button to create the instance ,

Widget Data Table : Class – Instance with Table
Here you can add widget,take data table as a widget as follows,

When you use the Data table as a widget,you need to select a table. For that first Select “Instance with Table” as a Class, (if class field is not available on the form then display it from Form Layout =>Slush Bucket)

Save it and then you will get some more fields on the form where you can select a table as below,


Display Icon :
To display icon,select “Icon Link” as a widget and Class “Instance with Link”,

Save the above form.
Now, After clicking on that icon,we need to select what should be displayed,as below,

Navigate to Service Portal URL, you will see the Icon which we have created as follows,

Click on that Icon, the page for “Create Incident” will be displayed as below,

Widget :
- Widgets are what define the content in your portal. You can use the base system widgets provided with Service Portal, clone and modify widgets, or develop custom widgets to fit your own needs.
- Base system widgets are read-only so you can benefit from future updates. To make changes, you can clone base system widgets. However, cloned widgets are considered custom and don’t benefit from future updates to the widgets they were cloned from.
- Widgets define what a portal does and what information a user sees.
- Widgets are AngularJS directives. When a page is loaded, widgets are getting loaded and its server side will execute first.
- For example,Search,Approvals,Catalog content,Knowledge Base these are some examples of widgets
To create widget,navigate to Service Portal => Widgets as below,

Click on New button to create a widget,the following form will be displayed,

Enter a name for the new widget.
Save the above form and at the bottom Click on “Open in Widget Editor” ,the following page will be displayed,
The widget HTML template, client script and server script display in the widget editor.Some default script templates are included as shown in below screenshot,

Problem Statement :
Create widget to display current user name .
Write the code as shown in below snapshot ,

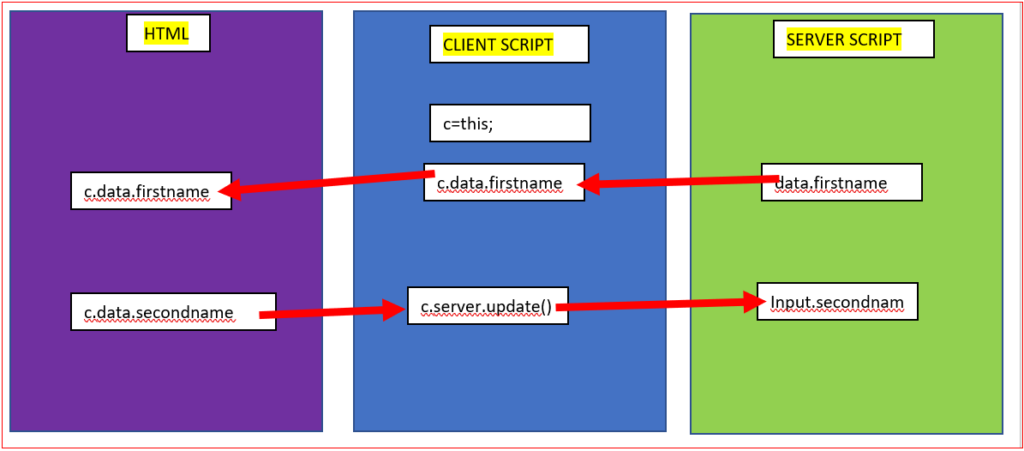
In above code,
In server script, data object is used to send the data from server side to client side.
In HTML Template the server side data (data.name) will be accessed using controller object ( c )
You can preview its output ,

If we make any changes on client side then that data can be send using server.update(),it will update all the changes to server side made in client side and that updated data can be used in server side using input object as below,


You can add this widget on a page of the service portal.