Software Testing Life Cycle (STLC)
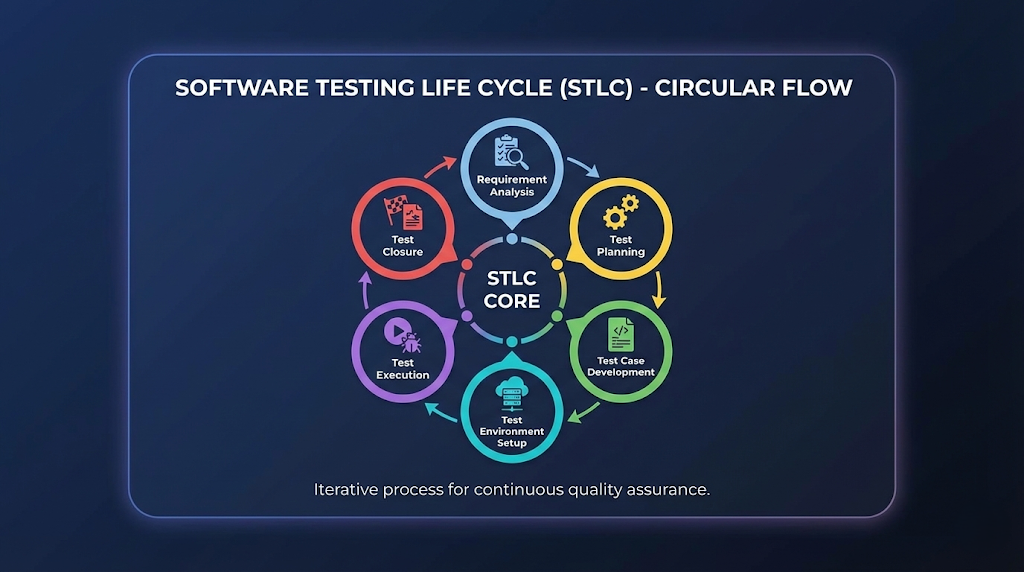
Software Testing Life Cycle (STLC) A Real-World, End-to-End Quality Engineering Workflow What Is STLC? Beyond the Textbook Definition In modern software delivery, testing is no longer a final checkpoint—it is a continuous quality assurance discipline embedded across the entire delivery pipeline. The Software Testing Life Cycle (STLC) defines a structured, repeatable, and measurable framework that ensures software meets functional, non-functional, business, and user expectations before it reaches production. This comprehensive guide goes beyond textbook definitions and dives into how STLC actually works in real projects, covering workflows, handoffs, risks, metrics, and production realities. The Core Reality: STLC is a QA-owned process that runs in parallel with the Software Development Life Cycle (SDLC). It provides a systematic approach to planning, designing, executing, and closing testing activities, ensuring defects are caught early and quality is engineered—not inspected at the end. In Real Environments, STLC: Starts before coding — Quality begins at requirements Influences architecture and design — Testability is a first-class concern Continues through post-release validation — Production monitoring is part of quality Acts as a risk-control mechanism — Protects business from costly failures STLC: Structured Quality Engineering Framework STLC High-Level Workflow Complete STLC Process Flow ┌────────────────────────────────────────────────────────────────┐ │ SOFTWARE TESTING LIFE CYCLE (STLC) │ └────────────────────────────────────────────────────────────────┘ Business Requirements │ ▼ ┌──────────────────┐ │ PHASE 1 │ Entry: BRD/SRD/User Stories │ REQUIREMENT │ Activities: Analyze, Clarify, De-risk │ ANALYSIS │ Exit: RTM, Risk Assessment └────────┬─────────┘ │ ▼ ┌──────────────────┐ │ PHASE 2 │ Entry: Requirements, RTM │ TEST │ Activities: Scope, Strategy, Estimation │ PLANNING │ Exit: Approved Test Plan └────────┬─────────┘ │ ▼ ┌──────────────────┐ │ PHASE 3 │ Entry: Test Plan, RTM │ TEST CASE │ Activities: Scenarios, Cases, Data │ DEVELOPMENT │ Exit: Reviewed Test Cases └────────┬─────────┘ │ ▼ ┌──────────────────┐ │ PHASE 4 │ Entry: Test Plan, Test Cases │ TEST │ Activities: Setup Env, Deploy Build │ ENVIRONMENT │ Exit: Ready Environment └────────┬─────────┘ │ ▼ ┌──────────────────┐ │ PHASE 5 │ Entry: Stable Build & Environment │ TEST │ Activities: Execute, Log Defects │ EXECUTION │ Exit: Tested Build w/ Status └────────┬─────────┘ │ ▼ ┌──────────────────┐ │ PHASE 6 │ Entry: Completed Execution │ TEST │ Activities: Summary, Retrospective │ CLOSURE │ Exit: Release Confidence └──────────────────┘ │ ▼ RELEASE READINESS Each phase has clearly defined Entry Criteria, Exit Criteria, and tangible Deliverables, ensuring traceability and audit readiness. Phase 1: Requirement Analysis — Where Quality Truly Begins Requirement Analysis This is the most underrated and most critical phase of STLC. What Happens in Reality QA does not just “read requirements”—they challenge, clarify, and de-risk them. This phase sets the foundation for everything that follows. Key Activities Analyze BRD / SRD / User StoriesReview all requirement documents for completeness, consistency, and testability. Identify Ambiguous RequirementsFlag unclear, missing, or conflicting requirements before development starts. Classify RequirementsSeparate functional from non-functional (performance, security, usability) requirements. Assess Automation FeasibilityIdentify which tests can be automated and which require manual validation. Identify Integration TouchpointsMap APIs, databases, third-party systems that need testing coordination. Real-World QA Questions During Analysis What happens if input is null or invalid? What is the expected failure behavior? What are rollback expectations if something goes wrong? What is the data retention or audit requirement? Is this requirement actually testable with available tools? What are the performance benchmarks (response time, throughput)? What security standards must be met (OWASP, GDPR)? Deliverables Deliverable Description Purpose Requirement Traceability Matrix (RTM) Maps requirements to test cases Ensures 100% requirement coverage Automation Feasibility Assessment Identifies automation candidates Guides tool selection and ROI Early Risk Identification Lists potential quality risks Enables proactive mitigation Entry Criteria: BRD, SRD, User Stories, Acceptance CriteriaExit Criteria: Approved RTM, clarified requirements, documented risks Requirement Analysis: The Foundation of Quality Phase 2: Test Planning — The Control Tower of Testing Test Planning Test Planning defines how testing will succeed or fail. What Happens in Real Projects This phase aligns business timelines, QA capacity, and technical constraints. Without proper planning, testing becomes reactive chaos instead of proactive risk management. Key Activities Define Test Scope & ExclusionsClearly state what WILL be tested and what WON’T be tested. Decide Manual vs Automation SplitBalance quick manual validation with long-term automation investment. Select Testing ToolsChoose tools for UI, API, performance, security, and mobile testing. Estimate Effort & ScheduleCalculate person-hours needed based on scope and complexity. Define Entry/Exit CriteriaSet clear gates for when testing starts and when it’s complete. Establish Defect Management StrategyDefine severity/priority levels, workflow, and communication. Identify Test MetricsDetermine KPIs: test coverage, defect density, pass rate. Risk Assessment & MitigationIdentify testing risks and plan contingencies. Test Plan Components Master Test Plan Structure 1. TEST SCOPE├─ In Scope: Features to be tested├─ Out of Scope: Exclusions with justification└─ Test Types: Functional, Integration, Regression, etc. 2. TEST STRATEGY├─ Test Levels: Unit, Integration, System, UAT├─ Test Approach: Manual, Automated, Exploratory└─ Test Techniques: Black-box, White-box, Gray-box 3. RESOURCE PLANNING├─ Team Structure: Roles & Responsibilities├─ Tools & Infrastructure└─ Training Requirements 4. SCHEDULE & MILESTONES├─ Test Phase Timeline├─ Key Deliverable Dates└─ Dependency Management 5. RISK & MITIGATION├─ Technical Risks├─ Resource Risks└─ Contingency Plans 6. DELIVERABLES├─ Test Cases├─ Test Reports└─ Defect Reports 7. ENTRY/EXIT CRITERIA├─ Start Conditions└─ Completion Criteria Deliverables Master Test Plan Document Resource Allocation Plan Test Environment Plan Risk Register with Mitigation Strategies Entry Criteria: Approved requirements, RTMExit Criteria: Approved Test Plan signed off by stakeholders Test Planning: Strategic Foundation for Quality Assurance Phase 3: Test Case Development — Designing Quality Test Case Development This phase converts requirements into executable validation logic. Real-World Best Practices Write test scenarios before detailed test cases Include negative, boundary, and edge cases Prepare realistic and diverse test data Ensure peer review and sign-off Make test cases reusable and maintainable Types of Test Cases Test Type Purpose Example Functional Verify feature behavior Login with valid credentials should succeed Regression Ensure existing features still work After bug fix, all related features work Integration Test component interactions Payment gateway integrates with order system API Validate API contracts GET /users returns 200 with user list Data Validation Check data accuracy Order total matches sum of